

I walk past a cafe on the way to the station every morning and they have gone Full Christmas with their decorations. We’re talking lights, tinsel, those foil decorations, card Santas and banners.
My favourite part is the jelly window stickers. That read “LET IT SNOW”. Which some, assuringly French, patron has rearranged to “LE TITS NOW”. I love it.
Ingredients
Swiss Roll
3 eggs
80gr caster sugar
80gr self raising flour
1/2 tsp baking powder
1/2 tsp vanilla extract
5 drops of blue food gel colouring
Filling
150ml double cream, whipped to medium stuff peaks
Jam (optional)
Method
1, Preheat your oven to 200o/c and line your Swiss roll tin with grease proof paper.
2, Beat your eggs and sugar together until very pale and fluffy, this should take a good three to five minutes in a stand mixer.
3, Gently fold through the flour until just combined.
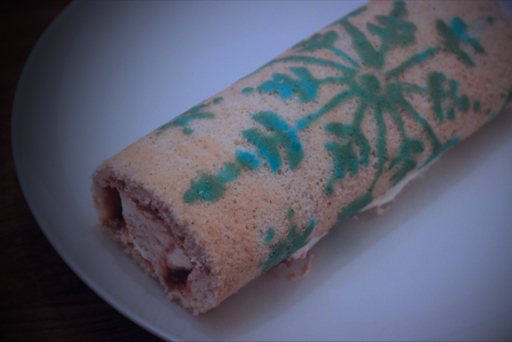
4, Remove about three tablespoons of the batter and in a separate bowl, colour it blue.
5, Place your stencil on the lined baking sheet and quickly spread a thin layer over it using a pastry brush. I used a gentle dabbing kind of technique. The snowflake stencil was from the pack of cake stencils. Try not to go over the same part twice or the batter will seep under the stencil. Peel off the stencil. Alternatively you could pipe/paint the snowflake onto the greaseproof.

6, Place the lined, snowflake adorned Swiss roll tin in the freezer for five minutes.
7, When the batter has set on the paper, give the rest of the batter a quick fold over and pour directly into the tin, take care smoothing it out over the detailing.
8, Bake for 7 minutes or until lightly golden brown and springy to the touch.
9, You need to work quickly on this part. Before you remove it from the oven had a glass of warm water and pastry brush to hand. Tear off two more sheets of grease proof and place one on your counter top. Take the Swiss roll out of the oven and invert onto the countertop.
10, Brush the water generously all over the top of the great proof paper. This creates a little steam that will help you lift off the paper with the detailing attached to the cake rather than the paper.
11, Slowly peel the paper back. It will still be quite warm. You might lose a little detailing, don’t worry.

12, Place the second sheet of paper on top and turn it back over so the detailing is on the bottom. Roll up the Swiss roll from the long side and leave to cool completely.
13, When you’re ready to fill the roll, gently unroll, remove the middle piece did grease proof paper and spread the cream (and jam, if using) inside. Re-roll and serve.

That is great idea! Beautiful!! 🙂
Aki (Your Home for Homemade Japanese Food)
http://japanese-food.org
Great idea. I’ve always fancied trying one of those stencilled swiss rolls as they always look so effective.
Le tits now – hahahaha!