IMG_9569
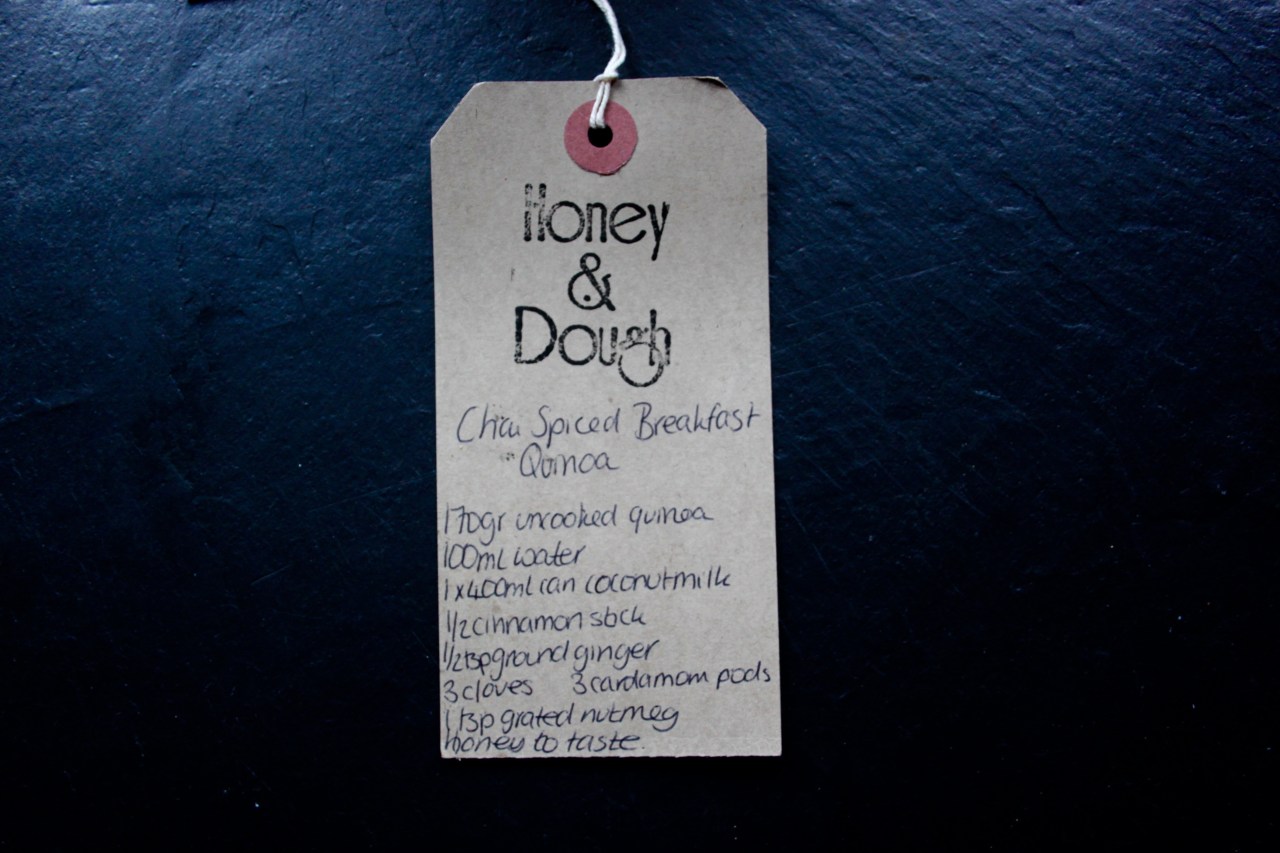
It’s time for the Annual Honey & Dough Quinoa recipe!
I had a conversation with a lovely lady last year (you should check out her blog – she is a babe) about courgetti. We came to the conclusion that courgetti is delicious, but so is actual real life carby spaghetti, and there wasn’t any likelihood of either of us eliminating either from our diets.
IMG_9554
I like cauliflower rice and normal rice. I like kale chips and crisps. I like porridge. But I also like this breakfast quinoa. Especially this one, because it’s spiced with all the good stuff.
IMG_9553
Ingredients
170gr uncooked quinoa
100ml cold water
1 x 400ml can of coconut milk
1/2 cinnamon stick
1/2tsp ground cinnamon
1/2 tsp ground ginger
 3 cloves
3 cardamom pods
2tsp freshly grated nutmeg (optional: plus more to serve)
Small pinch of salt
Honey to taste
IMG_9566
Method
1, Rinse your uncooked quinoa well until the water runs clear.  Place the quinoa in a medium sized saucepan with 100ml cold water and gently bring to a simmer.  Simmer for 10 minutes and skim off any scum.
2, Drain the quinoa well, throw away that water and return it back to the pan.  Add in all the other ingredients, except the honey, and stir well.
3, Bring back to a gentle simmer and stir continuously until the quinoa is soft and most of the coconut milk has been absorbed.  You’re looking for a porridgey like texture. If your quinoa isn’t cooked and you are running out of liquid, add a couple of splashes of water to cook out.  Fish out the cloves, cardamom pods and cinnamon stick.
4, Taste and stir through honey to taste.
5, Serve with a sprinkling of grated nutmeg.
IMG_9563

It’s the annual blog round up!

January, we scoffed a tasty Salmon, Kale & Quinoa bowl.
IMG_7823

February, we had another punt at the Good Housekeeping’s Cookery Compendium and cooked seven recipes. This was the six cup pudding and mock creamhere is a link to the round up.

IMG_7911

March, we went on an adventure:

IMG_8113San Fransisco

IMG_8129Driving down Route One

IMG_8181LA

IMG_8259
Grand Canyon

IMG_8390Las Vegas

April, #honeyanddoughhotsauce

IMG_8441

May, the hot sauce obsession continued with Hot Sauce Popcorn

IMG_8501

June, we finally polished off the last of the christmas sweets: Parma Violet Meringues.

IMG_8637

July, we played with biscuit cutters.

IMG_8839

August, we got crafty, and made blankets for a tiny beautiful human. Grey & White Shell Stitch Blanket

IMG_8858

September, I plundered my parents vegetable garden and pickled baby patty pan squashes

IMG_8958 (1)

October, I made the laziest soup ever: Lazy Girl Soup

IMG_9203

November, we pushed our inner reset buttons

IMG_9371

December, we went full Christmas with Blogmas

IMG_9525

IMG_9423

IMG_9536

Here’s to 2016!

IMG_8102

Screen Shot 2015-12-31 at 11.13.33

CC93C071-9E50-40FE-BB74-FF25BD95EEDA

I walk past a cafe on the way to the station every morning and they have gone Full Christmas with their decorations. We’re talking lights, tinsel, those foil decorations, card Santas and banners.

My favourite part is the jelly window stickers. That read “LET IT SNOW”. Which some, assuringly French, patron has rearranged to “LE TITS NOW”. I love it.

3E7F6F8F-E074-4AA0-9F55-0DD96FE58D9F

Ingredients

Swiss Roll
3 eggs
80gr caster sugar
80gr self raising flour
1/2 tsp baking powder
1/2 tsp vanilla extract
5 drops of blue food gel colouring

Filling
150ml double cream, whipped to medium stuff peaks
Jam (optional)

Method
1, Preheat your oven to 200o/c and line your Swiss roll tin with grease proof paper.
2, Beat your eggs and sugar together until very pale and fluffy, this should take a good three to five minutes in a stand mixer.
3, Gently fold through the flour until just combined.
4, Remove about three tablespoons of the batter and in a separate bowl, colour it blue.
5, Place your stencil on the lined baking sheet and quickly spread a thin layer over it using a pastry brush.  I used a gentle dabbing kind of technique. The snowflake stencil was from the pack of cake stencils. Try not to go over the same part twice or the batter will seep under the stencil. Peel off the stencil. Alternatively you could pipe/paint the snowflake onto the greaseproof.

BC44742B-39A3-4EFC-BA91-1AD4D62B0F1E
6, Place the lined, snowflake adorned Swiss roll tin in the freezer for five minutes.
7, When the batter has set on the paper, give the rest of the batter a quick fold over and pour directly into the tin, take care smoothing it out over the detailing.
8, Bake for 7 minutes or until lightly golden brown and springy to the touch.
9, You need to work quickly on this part. Before you remove it from the oven had a glass of warm water and pastry brush to hand. Tear off two more sheets of grease proof and place one on your counter top. Take the Swiss roll out of the oven and invert onto the countertop.
10, Brush the water generously all over the top of the great proof paper. This creates a little steam that will help you lift off the paper with the detailing attached to the cake rather than the paper.
11, Slowly peel the paper back. It will still be quite warm. You might lose a little detailing, don’t worry.

11C587FF-F64F-4C07-AE0F-9AC025DC55D9

12, Place the second sheet of paper on top and turn it back over so the detailing is on the bottom. Roll up the Swiss roll from the long side and leave to cool completely.
13, When you’re ready to fill the roll, gently unroll, remove the middle piece did grease proof paper and spread the cream (and jam, if using) inside. Re-roll and serve.